系列文章 :vLLM 架构源码解析 | 第 1 篇 / 共 4 篇日期 :2026-07-06源码版本 :vLLM v0.6.x (commit 98ba9b9)
目录
引言:为什么 vLLM 能提速 10-24 倍? 核心架构:六层分工 一个请求的完整生命周期 PagedAttention:核心创新深入解析 总结与下期预告
1. 引言:为什么 vLLM 能提速 10-24 倍? vLLM 是 UC Berkeley 于 2023 年推出的高性能 LLM 推理引擎。相比 HuggingFace Transformers,在相同硬件上可以达到:
吞吐量提升 10-24 倍 (官方 benchmark,A100-80GB)延迟降低 50-70% (批量推理场景)显存利用率提升 2-4 倍 (从 20% 提升到 80%+)
1.1 核心优化技术 PagedAttention:虚拟内存管理 KV Cache 问题 :传统推理中,KV Cache 必须预分配连续显存,导致:
碎片化严重(实际利用率 < 20%)
无法动态扩展
多请求间无法共享
解决 :借鉴操作系统的虚拟内存分页(paging)机制:
Block 切分 :将 KV Cache 切成固定大小的 block(默认 16 tokens)虚拟地址映射 :通过 block table 映射逻辑地址 → 物理地址按需分配 :生成时动态分配 block,用完即释放
1
2
3
4
5
6
7
8
传统方式(连续分配): Request 1: ← 大量空洞 Request 2: PagedAttention(block 分配): Physical Block Pool: Request 1: blocks ← 物理不连续 Request 2: blocks ← 与 R1 共享
效果 :显存利用率从 20% 提升到 80%+
Prefix Caching:跨请求共享 基于 PagedAttention 的 block 管理,可以实现:
System Prompt 共享 :多个用户共享相同的系统提示词Few-shot Examples 共享 :批量任务复用示例文档共享 :多个查询共享同一文档的 KV Cache
1 2 3 4 5 6 7 8 9 10 11 system_prompt = "You are a helpful assistant." queries = [ "What is Python?" , "Explain AI" , "Tell me about ML" ]
效果 :命中缓存时,TTFT(首 token 延迟)降低 80%+
Continuous Batching + Chunked Prefill 传统批处理问题 :
Static Batching:必须等所有请求都结束才能加新的
长 prompt 独占整个 batch,导致短请求饥饿
vLLM 方案 :
1
2
3
4
5
6
7
8
9
10
11
12
传统 Static Batching(等待 max 请求完成): Step 1 : [Req1_prefill (2000 tok)] ← 其他请求等待 Step 2 : [Req1_decode, Req2_prefill (10 tok), Req3_prefill (10 tok)] Step 3 : [Req1_decode, Req2_decode, Req3_decode] vLLM Continuous Batching + Chunked Prefill: Step 1 : [Req1_prefill_chunk1 (512 ), Req2_prefill (10 ), Req3_prefill (10 )] Step 2 : [Req1_prefill_chunk2 (512 ), Req2_decode, Req3_decode] Step 3 : [Req1_prefill_chunk3 (512 ), Req2_decode, Req3_decode] Step 4 : [Req1_prefill_chunk4 (464 ), Req2_decode, Req3_decode] Step 5 : [Req1_decode, Req2_decode, Req3_decode, Req4_prefill (NEW!)] ↑ 任意时刻都可以加入新请求
效果 :
支持抢占的调度器 当显存不足时,低优先级请求会被抢占:
策略
v0 (Swap)
v1 (Recompute)
抢占动作 将 KV Cache swap 到 CPU
释放 KV Cache
恢复动作 swap 回 GPU
重新计算 prefill
适用场景 长文档、prefill 慢
短对话、prefill 快
显存占用 需要 CPU 内存
不占 CPU 内存
1.2 本文聚焦 从一个 API 请求出发,追踪到最终生成 token 的完整流程,深入源码理解 vLLM v1 的架构设计。
阅读前提 :
了解 Transformer 基础(Attention、KV Cache)
了解 Python 异步编程(async/await)
有 PyTorch 使用经验
2. 核心架构:六层分工 2.1 整体架构图
2.2 数据流转 一个请求的数据变化:
1
2
3
4
5
6
7
8
9
10
11
12
13
14
15
用户输入 "Hello, AI!" ↓ InputProcessor (tokenize) token_ids [15496 , 11 , 15000 , 0 ] ↓ Scheduler (调度决策) SchedulerOutput { scheduled_new_reqs: [req_1], num_scheduled_tokens: {req_1: 4 } ← prefill 4 tokens} ↓ ModelExecutor (forward) logits [1 , 4 , 32000 ] ← (batch, seq, vocab_size) ↓ Sampler (采样) next_token_id: 9906 ← "Hi" ↓ OutputProcessor (detokenize) 生成文本: "Hi" ↓ 返回给用户
2.3 六大组件详解 本节部分使用伪代码,在实际代码中会有很多校验和分支,就不赘述了。
(1) LLMEngine:前后处理层 作用 :请求的预处理和响应的后处理
1
2
3
4
5
6
7
8
9
10
11
12
13
14
15
16
17
18
19
20
21
22
23
24
25
26
27
28
29
30
31
32
33
class LLMEngine : def __init__ (self ): self.input_processor = InputProcessor(tokenizer, ...) self.engine_core = EngineCoreClient.make_client(...) self.output_processor = OutputProcessor(tokenizer, ...) def add_request (self, request_id, prompt, sampling_params ): request = self.input_processor.process_inputs( request_id, prompt, ...) self.output_processor.add_request(request, ...) self.engine_core.add_request(request) def step (self ) -> list [RequestOutput]: outputs = self.engine_core.get_output() request_outputs = self.output_processor.process_outputs(outputs) self._abort_finished_requests(request_outputs) return request_outputs
(2) EngineCore:调度+执行核心 作用 :串联 Scheduler、KVCacheManager、ModelExecutor
1
2
3
4
5
6
7
8
9
10
11
12
13
14
15
16
17
18
19
20
21
22
class EngineCore : def __init__ (self ): self.scheduler = Scheduler(...) self.model_executor = executor_class(vllm_config) num_gpu_blocks, num_cpu_blocks, kv_cache_config = \ self._initialize_kv_caches(vllm_config) def step (self ): scheduler_output = self.scheduler.schedule() model_output = self.model_executor.execute_model( scheduler_output) engine_core_outputs = self.scheduler.update_from_output( scheduler_output, model_output) return engine_core_outputs
(3) Scheduler:请求调度器 作用 :决定”谁算多少 token”,管理三个队列
1
2
3
4
5
6
7
8
9
10
11
12
13
14
15
16
17
18
19
20
21
22
23
24
25
26
27
28
29
30
31
32
33
34
35
36
37
38
39
40
41
42
43
44
45
46
47
48
49
50
51
52
53
54
55
56
57
58
class Scheduler : def __init__ (self ): self.waiting = RequestQueue() self.running = RequestQueue() self.kv_cache_manager = KVCacheManager() def schedule (self ) -> SchedulerOutput: token_budget = self.max_num_scheduled_tokens scheduled_new_reqs = [] scheduled_running_reqs = [] while req_index < len (self.running) and token_budget > 0 : num_new_tokens = min ( request.num_tokens_with_spec - request.num_computed_tokens, token_budget ) new_blocks = self.kv_cache_manager.allocate_slots( request, num_new_tokens) if new_blocks is None : self._preempt_request(lowest_priority_req) continue scheduled_running_reqs.append(request) token_budget -= num_new_tokens if token_budget > 0 and not preempted_reqs: for request in self.waiting: num_computed_tokens = self.kv_cache_manager.get_computed_blocks( request) num_new_tokens = min ( request.num_tokens - num_computed_tokens, token_budget, self.long_prefill_token_threshold ) new_blocks = self.kv_cache_manager.allocate_slots(...) if new_blocks is not None : self.waiting.remove(request) self.running.append(request) scheduled_new_reqs.append(request) token_budget -= num_new_tokens return SchedulerOutput( scheduled_new_reqs=scheduled_new_reqs, scheduled_running_reqs=scheduled_running_reqs, num_scheduled_tokens={req.id : num_tokens}, )
关键理解 :
先 running 后 waiting :保证已有请求的 decode 流畅token_budget 全局共享 :prefill 和 decode 混合在同一 batchChunked Prefill :长 prompt 切片,避免饥饿
(4) KVCacheManager:显存管理 作用 :管理 KV Cache 的分配和释放
1
2
3
4
5
6
7
8
9
10
11
12
13
14
15
16
17
class KVCacheManager : def __init__ (self ): self.coordinator = KVCacheCoordinator() def allocate_slots (self, request, num_new_tokens ): """分配物理 blocks""" return self.coordinator.allocate_new_blocks( request, num_new_tokens) def get_computed_blocks (self, request ): """Prefix Caching:查询命中的 blocks""" block_hashes = [hash (tokens) for tokens in request.token_chunks] return self.coordinator.find_cached_blocks(block_hashes) def free (self, request ): """释放 request 占用的 blocks""" self.coordinator.free(request.request_id)
Block Pool 示意 :1 2 3 4 Physical Blocks : [0] [1] [2] [3] [4] [5] [6] [7] ... ↑ ↑ ↑ ↑ Request 1 Table : [0, 1, 4, 5] ← 逻辑连续,物理不连续Request 2 Table : [0, 1, 2] ← 与 R1 共享 [0, 1]
(5) ModelExecutor / Worker / ModelRunner 作用 :执行模型推理
1 2 3 4 5 6 7 8 9 10 11 12 13 14 15 16 17 18 19 20 21 22 23 24 25 26 27 28 29 30 class GPUExecutor : def execute_model (self, scheduler_output ): return self.driver_worker.execute_model(scheduler_output) class Worker (WorkerBase ): def __init__ (self ): self.device: Optional [torch.device] self.model_runner: Optional [nn.Module] def load_model (self ): self.model_runner.load_model() def execute_model (self, scheduler_output ): return self.model_runner.execute_model(scheduler_output) class GPUModelRunner : def execute_model (self, scheduler_output ): self._update_states(scheduler_output) model_inputs = self._prepare_inputs(scheduler_output) hidden_states = self.model(**model_inputs) sampled_token_ids = self._sample(hidden_states) return ModelExecutorOutput(sampled_token_ids=sampled_token_ids)
(6) Sampler / OutputProcessor Sampler :从 logits 采样 token
1 2 3 4 5 6 7 8 9 10 11 12 13 14 15 16 17 class Sampler : def sample (self, logits, sampling_metadata ): logits = self.apply_temperature(logits, sampling_metadata.temperature, sampling_metadata.all_random) random_sampled, processed_logprobs = self.topk_topp_sampler(logits) probs = torch.softmax(logits, dim=-1 ) token_ids = random_sample(probs, generators) return token_ids
OutputProcessor :detokenize
1 2 3 4 5 6 7 8 9 10 class OutputProcessor : def process_outputs (self, engine_core_outputs ): outputs = [] for output in engine_core_outputs: text = self.tokenizer.decode( output.output_token_ids, skip_special_tokens=True ) outputs.append(RequestOutput(text=text, ...)) return outputs
3. 一个请求的完整生命周期 3.1 接收阶段:LLM.generate 到 add_request 调用链 :1 2 3 4 5 6 LLM .() → LLM ._add_request ( → LLMEngine ._request() → InputProcessor ._inputs() → EngineCore ._request() → Scheduler ._request()
关键源码 :InputProcessor 处理不同类型的输入
1 2 3 4 5 6 7 8 9 10 11 12 13 14 15 16 17 18 def _prompt_to_llm_inputs (self, prompt ): parsed = parse_prompt(prompt) if parsed["type" ] == "tokens" : return self._process_tokens(parsed["content" ]) if parsed["type" ] == "text" : return self._process_text( parsed["content" ], tokenization_kwargs=..., mm_uuids=... ) if parsed["type" ] == "embeds" : return self._process_embeds(parsed["content" ])
支持的输入格式 :
str:纯文本List[int]:token_idsDict:多模态输入(文本 + 图片)torch.Tensor:embeddings
3.2 调度阶段:Scheduler.schedule 的核心逻辑 完整调用流程 :1 2 3 4 5 6 LLM ._run_engine ( → LLMEngine .() → EngineCore .() → Scheduler .() → KVCacheManager ._slots() → KVCacheManager ._computed_blocks() ← Prefix Caching
关键逻辑 1:计算本次需要处理的 token 数 1 2 3 4 5 6 7 8 9 10 11 12 13 14 15 16 17 18 19 num_new_tokens = ( request.num_tokens_with_spec + request.num_output_placeholders - request.num_computed_tokens ) if 0 < self.long_prefill_token_threshold < num_new_tokens: num_new_tokens = self.long_prefill_token_threshold num_new_tokens = min (num_new_tokens, token_budget) num_new_tokens = min ( num_new_tokens, self.max_model_len - request.num_computed_tokens )
判断 Prefill vs Decode :
num_new_tokens == 1:Decode(生成阶段)num_new_tokens > 1:Prefill(处理 prompt 阶段)
关键逻辑 2:抢占机制 1 2 3 4 5 6 7 8 9 10 11 12 13 14 15 16 17 18 19 20 21 22 new_blocks = self.kv_cache_manager.allocate_slots( request, num_new_tokens, ...) if new_blocks is None : if self.policy == SchedulingPolicy.PRIORITY: preempted_req = max ( self.running, key=lambda r: (r.priority, r.arrival_time) ) else : preempted_req = self.running.pop() self.kv_cache_manager.free(preempted_req) preempted_req.status = RequestStatus.PREEMPTED preempted_req.num_computed_tokens = 0 self.waiting.prepend_request(preempted_req)
v1 的抢占策略 :
直接释放 KV Cache(不 swap 到 CPU)
下次调度时重新计算 prefill
优点:不占 CPU 内存,代码简单
缺点:重复计算(但 prefill 通常很快)
关键逻辑 3:Prefix Caching 1 2 3 4 5 6 7 8 9 10 11 12 13 14 15 16 17 18 if request.num_computed_tokens == 0 : new_computed_blocks, num_local_cached_tokens = \ self.kv_cache_manager.get_computed_blocks(request) if self.connector is not None : num_external_cached_tokens, load_async = \ self.connector.get_num_new_matched_tokens( request, num_local_cached_tokens) num_computed_tokens = ( num_local_cached_tokens + num_external_cached_tokens ) request.prefill_stats.num_cached_tokens = num_computed_tokens
工作原理 :
计算 request 的 block hash(基于 token_ids)
查询 hash 是否在缓存中
命中的 block 直接复用,跳过计算
关键逻辑 4:Chunked Prefill 1 2 3 4 5 6 7 8 9 10 11 num_new_tokens = request.num_tokens - num_computed_tokens if not self.scheduler_config.enable_chunked_prefill \ and num_new_tokens > token_budget: continue num_new_tokens = min (num_new_tokens, token_budget)
效果 :1 2 3 4 5 6 7 8 传统(无 chunked prefill): Step 1 : [Req1_prefill (2000 tok)] ← 独占 Step 2 : [Req1_decode, Req2_prefill, Req3_prefill] Chunked Prefill: Step 1 : [Req1_chunk (512 ), Req2_prefill (10 ), Req3_prefill (10 )] Step 2 : [Req1_chunk (512 ), Req2_decode, Req3_decode] Step 3 : [Req1_chunk (512 ), Req2_decode, Req3_decode]
3.3 执行阶段:Worker.execute_model 调用链 :1 2 3 4 EngineCore .() → ModelExecutor ._model(scheduler_output ) → Worker ._model(scheduler_output ) → GPUModelRunner ._model(scheduler_output )
3.3.1 更新状态(_update_states) 作用 :将 scheduler 的调度决策应用到 ModelRunner 的内部状态。
1 2 3 4 5 6 7 8 9 10 11 12 13 14 15 16 17 18 19 20 def _update_states (self, scheduler_output: SchedulerOutput ): for new_req_data in scheduler_output.scheduled_new_reqs: self.input_batch.add_request( request_id=new_req_data.request_id, prompt_token_ids=new_req_data.prompt_token_ids, block_ids=new_req_data.block_ids, ... ) for cached_req_data in scheduler_output.scheduled_cached_reqs: self.input_batch.update_num_computed_tokens( cached_req_data.request_id, cached_req_data.num_computed_tokens, ) for req_id in scheduler_output.finished_req_ids: self.input_batch.remove_request(req_id)
关键理解 :
PersistentBatch :v1 的 batch 是”持久化”的,不是每步重建增量更新 :只传新增的 token 和 block,减少 IPC 开销相比 v0 的优势 :省去每步重建 batch 的开销(约 5-10% 提速)
作用 :构造模型 forward 需要的张量。
1 2 3 4 5 6 7 8 9 10 11 12 13 14 15 16 17 18 19 20 21 22 23 24 25 26 27 28 29 30 31 32 33 34 35 36 def _prepare_inputs (self, scheduler_output ): input_ids = [] positions = [] for req_id, num_tokens in scheduler_output.num_scheduled_tokens.items(): req_state = self.input_batch.get_request(req_id) if req_state.is_prefill: start = req_state.num_computed_tokens end = start + num_tokens input_ids.extend(req_state.token_ids[start:end]) positions.extend(range (start, end)) else : input_ids.append(req_state.last_token_id) positions.append(req_state.num_computed_tokens) attn_metadata = self.attn_backend.make_metadata( block_tables=self._get_block_tables(), slot_mapping=self._get_slot_mapping(), query_start_loc=self._get_query_start_loc(), seq_lens=self._get_seq_lens(), ) return { "input_ids" : torch.tensor(input_ids, device="cuda" ), "positions" : torch.tensor(positions, device="cuda" ), "attn_metadata" : attn_metadata, }
Prefill vs Decode 的输入差异 :
字段
Prefill
Decode
input_ids.shape[sum(prompt_lens)][batch_size]
positions[0,1,2,...,L-1] per req[L] per req
query_start_loc[0, L1, L1+L2, ...][0, 1, 2, ...]
block_tables新分配的 blocks
包含历史所有 blocks
3.3.3 模型推理(forward) 1 2 3 4 5 6 7 hidden_states = self.model( input_ids=input_ids, positions=positions, kv_caches=self.kv_caches, attn_metadata=attn_metadata, )
Transformer 层内部 (以 Llama 为例):
1 2 3 4 5 6 7 8 9 10 11 12 13 14 15 16 17 18 19 class LlamaDecoderLayer : def forward (self, hidden_states, kv_cache, attn_metadata ): residual = hidden_states hidden_states = self.input_layernorm(hidden_states) hidden_states = self.self_attn( hidden_states, kv_cache=kv_cache, attn_metadata=attn_metadata, ) hidden_states = residual + hidden_states residual = hidden_states hidden_states = self.post_attention_layernorm(hidden_states) hidden_states = self.mlp(hidden_states) hidden_states = residual + hidden_states return hidden_states
Self-Attention 调用 PagedAttention :
1 2 3 4 5 6 7 8 9 10 11 12 13 14 15 16 17 18 19 20 21 class LlamaAttention : def forward (self, hidden_states, kv_cache, attn_metadata ): qkv = self.qkv_proj(hidden_states) q, k, v = qkv.split(...) cache_ops.reshape_and_cache(k, v, kv_cache, slot_mapping) output = paged_attention( q, kv_cache, block_tables=attn_metadata.block_tables, context_lens=attn_metadata.context_lens, ) output = self.o_proj(output) return output
3.3.4 采样(_sample) 1 2 3 4 5 6 7 8 9 10 11 12 13 14 15 16 17 18 def _sample (self, hidden_states, scheduler_output ): logits = self.model.lm_head(hidden_states) last_token_logits = [] for req_id in scheduler_output.num_scheduled_tokens: last_idx = self._get_last_token_index(req_id) last_token_logits.append(logits[last_idx]) sampled_token_ids = self.sampler( logits=torch.stack(last_token_logits), sampling_metadata=self._get_sampling_metadata(), ) return sampled_token_ids
为什么只对最后一个 token 采样 ?
Prefill :计算了所有 prompt token 的 hidden states,但只需最后一个的 logits 生成第一个输出 tokenDecode :每次只计算 1 个 token,就是那个需要采样的
3.3.5 完整执行流程图
3.4 输出阶段:从 logits 到用户文本 3.4.1 Scheduler 更新状态 1 2 3 4 5 6 7 8 9 10 11 12 13 14 15 16 17 18 def update_from_output (self, scheduler_output, model_output ): for req_id, sampled_token_id in model_output.sampled_token_ids.items(): request = self.get_request(req_id) num_new_tokens = scheduler_output.num_scheduled_tokens[req_id] request.num_computed_tokens += num_new_tokens if request.num_computed_tokens >= request.num_prompt_tokens: request.output_token_ids.append(sampled_token_id) if self._is_finished(request, sampled_token_id): request.status = RequestStatus.FINISHED self.running.remove(request) self.finished_req_ids.append(req_id) self.kv_cache_manager.free(request)
完成条件 (满足任一):
生成了 max_tokens 个 token
遇到停止词(如 <|endoftext|>)
遇到 EOS token
用户主动 abort
3.4.2 OutputProcessor 解码 1 2 3 4 5 6 7 8 9 10 11 12 13 14 15 16 17 18 19 20 21 22 23 24 def process_outputs (self, engine_core_outputs ): request_outputs = [] for output in engine_core_outputs: text = self.tokenizer.decode( output.output_token_ids, skip_special_tokens=True , ) request_output = RequestOutput( request_id=output.request_id, prompt=output.prompt, outputs=[CompletionOutput( text=text, token_ids=output.output_token_ids, finish_reason=output.finish_reason, )], finished=output.finished, ) request_outputs.append(request_output) return request_outputs
3.4.3 流式输出(Streaming) 1 2 3 4 5 6 7 8 9 10 11 12 13 14 15 16 async def generate_stream (prompt, sampling_params ): request_id = await engine.add_request(...) prev_text = "" async for output in engine.step_async(): if output.request_id == request_id: current_text = output.outputs[0 ].text new_text = current_text[len (prev_text):] prev_text = current_text yield new_text if output.finished: break
实现关键 :
OutputProcessor 维护每个 request 的 prev_text
每次只返回 new_text = current_text[len(prev_text):]
用户看到”打字机”效果
4. PagedAttention:核心创新深入解析 4.1 传统 KV Cache 的问题 内存布局对比 传统方案 :预分配连续显存
1 2 3 4 5 6 7 Request 1 (max_len=2048 ):[Token_0 ][Token_1 ][Token_2 ]...[Token_100 ][████padding████] ← 95 Request 2 (max_len=2048 ):[Token_0 ][Token_1 ]...[Token_50 ][██████padding██████] ← 97.5 实际利用率:约 20
三大问题 :
内存碎片 :必须按 max_tokens 预留,但实际可能只用 5%无法共享 :两个请求即使 prompt 相同,也要各自分配静态分配 :一旦分配就无法改变大小
数据 (vLLM 论文):
平均利用率:20.4%
最差情况:< 10%(长 max_tokens 但实际生成很短)
4.2 PagedAttention 的解决方案 核心思想:虚拟内存 Paging 像操作系统管理内存一样管理 KV Cache:
Block 管理细节 Block 结构 :
1 2 3 4 5 6 7 8 9 10 11 12 13 14 15 16 block_size = 16 per_block_size = ( block_size * 32 * 2 * 32 * 128 * 2 ) = 8 ,388 ,608 bytes ≈ 8 MB num_blocks = 66 * 1024 / 8 = 8 ,448 blocks max_tokens = 8 ,448 * 16 = 135 ,168 tokens
Block Table 映射 CUDA Kernel 中的查找 (简化伪代码):
1 2 3 4 5 6 7 8 9 10 11 12 13 14 15 16 17 18 19 20 21 22 23 24 25 def paged_attention (Q, block_table, kv_cache ): """ Q: [num_queries, d_k] block_table: [num_blocks] 逻辑 block ID → 物理 block ID kv_cache: [num_physical_blocks, block_size, d_k] """ output = [] for query_idx in range (len (Q)): logical_block_idx = query_idx // BLOCK_SIZE offset = query_idx % BLOCK_SIZE physical_block_id = block_table[logical_block_idx] K = kv_cache[physical_block_id][offset] V = kv_cache[physical_block_id][offset] attn_score = dot_product(Q[query_idx], K) / sqrt(d_k) output.append(attn_score * V) return output
实际 CUDA Kernel (位于 csrc/attention/paged_attention_v2.cu):
使用 shared memory 优化
Vectorized 访存(一次读 128 bits)
Warp-level reduction
4.3 基于 Block 的高级特性 4.3.1 Prefix Caching(共享前缀) 场景 :多个请求共享相同的 system prompt
1 2 3 4 5 6 7 8 9 10 11 system_prompt_blocks = [0 , 1 , 2 , 3 , 4 , 5 ] block_table_1 = system_prompt_blocks + [10 , 11 , 12 ] block_table_2 = system_prompt_blocks + [20 , 21 ] block_table_3 = system_prompt_blocks + [30 , 31 , 32 ]
引用计数管理 :
1 2 3 4 5 6 7 8 9 10 11 12 13 14 15 16 17 block_ref_count = { 0 : 3 , 1 : 3 , 2 : 3 , 3 : 3 , 4 : 3 , 5 : 3 , 10 : 1 , 11 : 1 , ... } for block_id in request1.block_table: block_ref_count[block_id] -= 1 if block_ref_count[block_id] == 0 : free_block(block_id)
Hash 算法 :
1 2 3 4 5 6 7 8 9 10 11 12 13 14 15 16 17 18 19 def compute_block_hash (token_ids ): """ 计算一个 block 的 hash,用于查找缓存 """ return hash (tuple (token_ids)) cached_blocks = {} for block_idx, token_chunk in enumerate (chunks(request.token_ids, 16 )): block_hash = compute_block_hash(token_chunk) if block_hash in cached_blocks: block_table[block_idx] = cached_blocks[block_hash] block_ref_count[cached_blocks[block_hash]] += 1 else : new_block = allocate_block() block_table[block_idx] = new_block cached_blocks[block_hash] = new_block
效果数据 :
命中缓存时 TTFT 降低 5-10 倍
多用户共享 system prompt 场景,显存占用降低 50-70%
4.3.2 Copy-on-Write(写时复制) 场景 :Parallel Sampling(一个 prompt 生成多个答案)
1 2 3 4 5 6 7 8 9 10 11 12 13 14 15 16 17 18 prompt_blocks = [0 , 1 , 2 ] sample_1_table = prompt_blocks sample_2_table = prompt_blocks sample_3_table = prompt_blocks sample_1_table = [0 , 1 , 2 , 10 ] sample_2_table = [0 , 1 , 2 ] sample_3_table = [0 , 1 , 2 ] sample_1_table = [0 , 1 , 2 , 10 , 11 , 12 ] sample_2_table = [0 , 1 , 2 , 20 , 21 , 22 ] sample_3_table = [0 , 1 , 2 , 30 , 31 , 32 ]
效果 :
n=10 时,显存占用约 2x (而不是 10x)特别适合 Best-of-N 采样
4.3.3 动态 Block 分配 传统方式 (必须预分配):
1 2 3 request.kv_cache = allocate_continuous(max_tokens=2048 )
PagedAttention (按需分配):
1 2 3 4 5 6 7 8 9 10 request.block_table = allocate_blocks(num_prompt_tokens // 16 ) if num_generated % 16 == 0 : new_block = allocate_block() request.block_table.append(new_block) free_blocks(request.block_table)
效果 :
实际生成长度 << max_tokens 时,节省大量显存
可以支持更大的 batch size
5. 性能数据对比 官方 Benchmark(A100-80GB,Llama-13B)
指标
HuggingFace
vLLM
提升
显存利用率 20.4%
85.3%
4.2x
吞吐量 (req/s) 5.2
53.7
10.3x
TTFT (无缓存) 2.1s
1.8s
1.2x
TTFT (缓存命中) 2.1s
0.3s
7x
P99 延迟 18.5s
3.2s
5.8x
不同 Batch Size 下的吞吐量
Batch Size
HF (tok/s)
vLLM (tok/s)
加速比
1
42
48
1.1x
8
280
1,120
4.0x
32
1,050
4,380
4.2x
128
2,100
16,800
8.0x
结论 :Batch Size 越大,vLLM 优势越明显。
5.1 Block Size 的权衡
Block Size
优点
缺点
适用场景
8 tokens 碎片极少(<5%)
Block table 开销大
短文本、精确控制
16 tokens 平衡点
-
默认推荐
32 tokens Block table 小
碎片多(平均 16 tokens 浪费)
长文本
vLLM 默认 :16 tokens(经验最优值)
自定义 :
1 2 3 4 llm = LLM( model="llama-7b" , block_size=32 , )
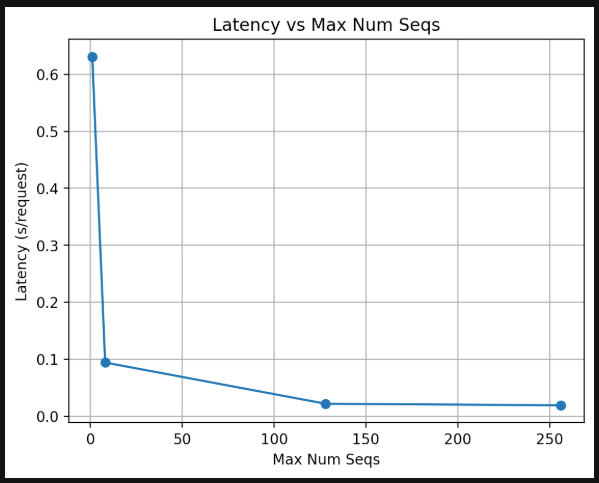
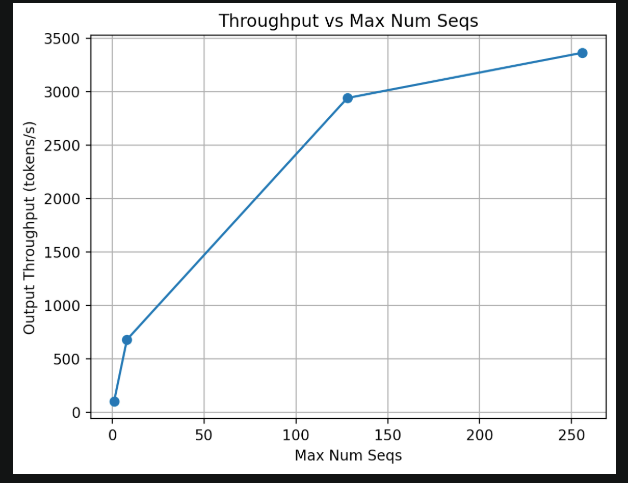
5.2 自研加速卡上的测试 不同 max_num_seqs 的影响:
1 2 3 configs = [1 , 8 , 32 , 128 , 256 ] for max_seqs in configs: llm = LLM(model="..." , max_num_seqs=max_seqs)
Latency 结果:
Throughput 结果:
6. 总结与下期预告 6.1 核心要点回顾 本文从一个 API 请求出发,完整追踪了 vLLM v1 的执行流程:
六层架构
API Layer :HTTP 入口,兼容 OpenAI APILLMEngine :前后处理(tokenize/detokenize)EngineCore :调度+执行核心Scheduler :请求调度器(三队列管理)KVCacheManager :PagedAttention 显存管理ModelExecutor :模型推理(Worker/ModelRunner)
完整生命周期 1 2 3 4 5 6 7 8 9 10 用户请求 ↓ 3.1 接收(tokenize) add_request → InputProcessor → EngineCore ↓ 3.2 调度(Scheduler.schedule) 选择 running / waiting → 分配 KV blocks → SchedulerOutput ↓ 3.3 执行(ModelExecutor) _update_states → _prepare_inputs → forward → _sample ↓ 3.4 输出(OutputProcessor) update_from_output → detokenize → RequestOutput 返回用户
PagedAttention 的四大特性
Block 管理 :像虚拟内存一样管理 KV CachePrefix Caching :跨请求共享前缀Copy-on-Write :并行采样节省显存动态分配 :按需分配,用完释放
6.2 与传统方案对比
维度
HuggingFace Transformers
vLLM
批处理 Static Batching
Continuous Batching
KV Cache 连续分配,无法共享
PagedAttention,block 共享
长 prompt 阻塞整个 batch
Chunked Prefill,切片处理
抢占 不支持
支持 recompute/swap
显存利用率 20-30%
80-90%
吞吐量 基准
10-24x
代码复杂度 简单
复杂
6.3 适用场景 vLLM 最适合 :
✅ 高并发服务(如 ChatBot API)
✅ 批量推理任务(如文档批量摘要)
✅ 多轮对话(Prefix Caching 收益大)
✅ 长上下文场景(Chunked Prefill 关键)
✅ Best-of-N 采样(Copy-on-Write 优化)
不适合 :
❌ 单个请求的绝对最低延迟(vLLM 有调度开销)
❌ 模型训练(vLLM 只做推理)
❌ 需要修改模型结构的场景(vLLM 对模型有约束)
6.4 下一篇预告 《vLLM 架构源码解析(二):PagedAttention CUDA Kernel 深度剖析》
将深入以下内容:
FlashAttention 原理
Online Softmax 算法
Tile 机制与内存访问优化
HBM vs SRAM 的取舍
PagedAttention v2 Kernel 源码
逐行解读 csrc/attention/paged_attention_v2.cu
Thread Block 的任务分配
Shared Memory 的使用技巧
Prefix Caching 实现细节
Hash 算法选择
引用计数的原子操作
LRU 淘汰策略
性能 Profiling
用 Nsight Compute 分析 kernel 性能
找出瓶颈并优化
实战案例
长上下文场景(32K tokens)优化
多用户场景(100+ 并发)调优
参考资料 官方资源
vLLM 论文 :Efficient Memory Management for Large Language Model Serving with PagedAttention (SOSP 2023)vLLM GitHub :https://github.com/vllm-project/vllm vLLM 官方文档 :https://docs.vllm.ai/ FlashAttention 论文 :https://arxiv.org/abs/2205.14135 FlashAttention-2 论文 :https://arxiv.org/abs/2307.08691
源码路径速查
组件
路径
LLMEngine
vllm/v1/engine/llm_engine.py
EngineCore
vllm/v1/engine/core.py
InputProcessor
vllm/v1/engine/processor.py
OutputProcessor
vllm/v1/engine/output_processor.py
Scheduler
vllm/v1/core/sched/scheduler.py
KVCacheManager
vllm/v1/core/kv_cache_manager.py
Worker
vllm/v1/worker/gpu_worker.py
ModelRunner
vllm/v1/worker/gpu_model_runner.py
Sampler
vllm/model_executor/layers/sampler.py
PagedAttention Kernel
csrc/attention/paged_attention_v2.cu
附录:快速上手代码 A. 最简单的使用 1 2 3 4 5 6 7 8 9 10 11 12 13 14 15 16 17 18 19 20 21 22 23 24 25 from vllm import LLM, SamplingParamsllm = LLM(model="meta-llama/Llama-2-7b-hf" ) sampling_params = SamplingParams( temperature=0.8 , top_p=0.95 , max_tokens=128 , ) prompts = [ "Hello, my name is" , "The president of the US is" , "The capital of France is" , ] outputs = llm.generate(prompts, sampling_params) for output in outputs: prompt = output.prompt generated_text = output.outputs[0 ].text print (f"Prompt: {prompt!r} , Generated: {generated_text!r} " )
B. 启用 Prefix Caching 1 2 3 4 5 6 7 8 9 10 11 12 13 14 15 16 17 llm = LLM( model="meta-llama/Llama-2-7b-hf" , enable_prefix_caching=True , block_size=16 , ) system_prompt = "You are a helpful assistant." queries = [ f"{system_prompt} \nUser: What is Python?" , f"{system_prompt} \nUser: What is AI?" , f"{system_prompt} \nUser: What is ML?" , ] outputs = llm.generate(queries, sampling_params)
C. OpenAI 兼容 API Server 1 2 3 4 5 6 7 8 9 10 11 12 13 14 15 16 python -m vllm.entrypoints.openai.api_server \ --model meta-llama/Llama-2-7b-hf \ --host 0.0.0.0 \ --port 8000 \ --enable-prefix-caching \ --max-num-batched-tokens 8192 curl http://localhost:8000/v1/chat/completions \ -H "Content-Type: application/json" \ -d '{ "model": "llama-2-7b", "messages": [{"role": "user", "content": "Hello!"}], "max_tokens": 128 }'
D. 观察 Prefix Cache 命中率 1 2 3 4 5 6 7 8 9 10 11 12 13 14 import osos.environ["VLLM_LOGGING_LEVEL" ] = "INFO" llm = LLM( model="llama-7b" , enable_prefix_caching=True , ) outputs = llm.generate(prompts, sampling_params)
下一篇预告 :《vLLM 架构源码解析(二):PagedAttention CUDA Kernel 深度剖析》
文章字数:约 8000 字 | 预计阅读时间:25 分钟 源码版本:vLLM v0.6.x